Fun Homemade Party Decorations to Make with Kids for Every Theme
A party feels more special when the decorations have little fingerprints, crooked stickers, and a few delightfully uneven paper shapes. Homemade party decorations do not need to look store-bought to be wonderful. They need to feel joyful, safe, and personal.
Making decorations with kids turns party prep into part of the celebration. Younger children can tear paper, sort colors, and add stickers. Older kids can measure, cut, design signs, and lead a project from start to finish. Everyone gets a role, and the finished room tells a story before the first guest arrives.

Start with safe supplies that are easy to find
The best party crafts use materials you already have or can grab during a regular grocery or craft store trip. Skip anything sharp, toxic, or too messy for the space. If toddlers are helping, avoid tiny pieces that could become choking hazards.
A good starter kit might include:
Construction paper and cardstock (https://amzn.to/4zUX10V)(https://amzn.to/4iQnpTt)
Paper plates and paper cups (https://amzn.to/3UFBj0X)(https://amzn.to/4ihHYIw)
Tissue paper and coffee filters (https://amzn.to/4gZ4Ie5)(https://amzn.to/4hi2Flx)
Washable markers and crayons (https://amzn.to/4yqs4Ad)(https://amzn.to/4qW1qN2)
Glue sticks and child-safe tape (https://amzn.to/4xgqoZ4)(https://amzn.to/3SP8pLg)
Safety scissors for older preschoolers and up (https://amzn.to/4iRsFq1)
Yarn, ribbon, or string with adult help (https://amzn.to/4yiJ8Ii)(https://amzn.to/4yofpOb)(https://amzn.to/4gIj2J2)
Stickers and foam shapes (https://amzn.to/4xM5Toe)(https://amzn.to/3SKZx9r)
Cardboard from cereal boxes or shipping boxes
Recyclable jars, tubes, and containers
Set everything out in the middle of the table so kids can make choices. A plastic tablecloth, old sheet, or flattened paper grocery bags can protect the work surface.
For a smoother craft session, make a small grown-up station for trickier tasks. Adults can handle hole punching, tying knots, trimming thick cardboard, and hanging decorations. Kids still get to create, while adults keep the process safe and relaxed.
Pick projects that fit each age group
The easiest way to keep everyone happy is to match the project to the child’s current skills. A 3-year-old may love sticking dots onto a banner, while a 10-year-old may want to design a full photo booth backdrop. Both count as real contributions.
Age group | Great projects | Helpful grown-up role |
Toddlers | Sticker crowns, sponge-painted paper, torn-paper confetti | Pre-cut shapes and supervise glue |
Preschoolers | Paper plate masks, handprint garlands, cupcake liner flowers | Help with cutting and tying |
Early elementary kids | Party hats, banners, paper chains, straw toppers | Offer templates and spacing help |
Tweens | Themed signs, photo booth props, centerpieces, layered garlands | Let them plan and lead |
One easy all-ages project is a paper chain countdown garland. Cut strips of paper in party colors. Younger kids decorate the strips with stickers or stamps. Older kids write jokes, birthday wishes, or activity ideas on each strip. Loop and tape the strips together, then hang the chain across a doorway or dessert table.
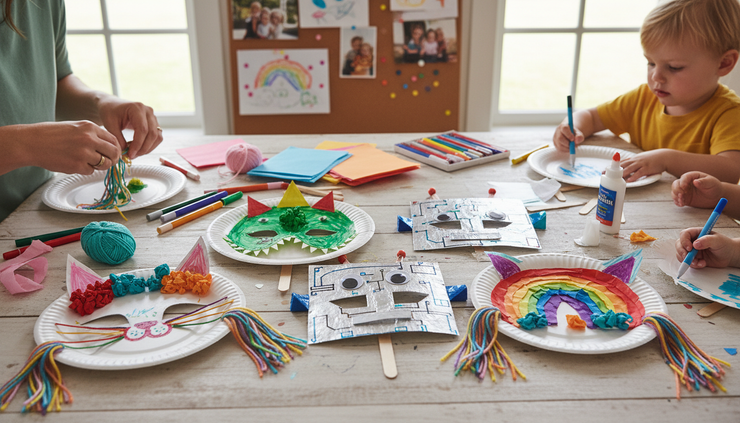
Another favorite is a paper plate party mask. Cut eye holes ahead of time, then let kids add ears, feathers made from paper, yarn hair, or marker details. Use a craft stick as a handle instead of elastic for a safer, easier option.
Make party decorations that work for any theme
A simple decoration can fit almost any party when you change the colors, shapes, and small details. That means you do not need a brand-new idea for every birthday, graduation, backyard party, or family movie night.
Try these flexible projects:
Name banner
Cut triangles, circles, or rectangles from cardstock. Kids can add letters, drawings, stickers, or glitter glue if you are comfortable with sparkle cleanup. String the pieces across a mantle, window, or wall.
Theme ideas include stars for a space party, shells for an ocean party, leaves for a camping party, or balloons for a classic birthday.
Tissue paper flowers
Stack a few sheets of tissue paper, fold them like an accordion, tie the center with yarn, and gently pull the layers apart. Younger kids can choose colors and fluff the petals. Older kids can make different sizes.
Use pinks and reds for a garden tea party, bright rainbow colors for a summer party, or white and silver for a snow theme.
Cupcake liner garland
Flatten cupcake liners and tape them to string. Layer smaller liners inside larger ones for a flower look. Kids can draw faces, stars, numbers, or tiny messages in the centers.
This works especially well for dessert tables, playroom parties, and sleepovers.
Cardboard centerpiece shapes
Cut simple shapes from cardboard, then let kids paint or cover them with paper. Stand them in jars filled with dried beans, rice, or crumpled tissue paper. Keep glass jars away from younger kids, or use paper cups instead.
The shapes can become rockets, animals, sports balls, hearts, crowns, or pumpkins.
Add personal touches that make the party feel like yours
Personalizing decorations does not need to be complicated. Start with the guest of honor’s favorite colors, animals, hobbies, books, games, or snacks. Then build small details around that idea.
For a dinosaur party, kids can cut jagged green paper leaves, make footprint signs, and draw baby dinosaurs on place cards. For a fairy or garden theme, they can make coffee filter butterflies and tissue paper flowers. For a sports party, they can create pennants in team colors and decorate paper cups with jersey numbers.
Try a few of these easy personal touches:
Use the child’s age as a repeating shape or number.
Add guests’ names to place cards or favor bags.
Let each family member make one decoration in their own style.
Choose a three-color palette to keep mixed crafts looking connected.
Turn drawings into wall art by taping them in matching paper frames.
Make a “welcome” sign with handprints from siblings or friends.
The goal is not perfection. A handmade banner with uneven letters often feels warmer than a perfect printed one. Kids notice when their work is displayed with pride.

Keep teamwork at the center of the fun
Party crafting goes better when everyone knows their job. Before starting, pick a few simple roles. One child can be the color picker. Another can be the sticker expert. An older child can be the pattern planner or sign designer. Adults can handle setup, safety, and hanging.
A few teamwork tips help keep the mood light:
Make one sample, then let kids change it.
Praise effort and ideas, not just neatness.
Keep sessions short, especially for young kids.
Put finished pieces in a “party pile” so they feel progress.
Take breaks for snacks, music, or a quick dance party.
Let kids decide where some decorations should go.
If siblings have different styles, give each child a section of the room to decorate. One can design the snack table sign, while another makes wall garlands. The party will feel more playful because it includes everyone’s ideas.

Homemade party decorations are really about making memories before the party even starts. Choose safe supplies, keep the projects simple, and let kids bring their own ideas to the table. Whether the theme is outer space, woodland animals, rainbows, sports, or a favorite color, a little teamwork can turn paper, glue, and imagination into a celebration that feels completely personal.
Comments