DIY All Natural Clay for Kids Easy Safe Craft Ideas and Step by Step Guide
A quiet afternoon can turn into a full craft session with a mixing bowl, a little flour, and curious hands ready to squish, roll, and build. Homemade clay is simple, low-cost, and wonderfully open-ended. Children can make tiny animals, pretend food, beads, fossils, handprints, ornaments, and anything else their imagination invents.
This guide walks through a gentle, pantry-based clay recipe made without glue, borax, or harsh ingredients. It is a great choice for parents and caregivers who want a safer craft that still feels exciting and hands-on.

Why homemade natural clay is a great kid craft
DIY all-natural clay gives children a chance to explore texture, shape, color, and problem-solving. It feels like play, but it also supports fine motor skills as kids pinch, roll, flatten, cut, and press.
It is also forgiving. If a project falls apart, the clay can usually be squished back into a ball and tried again. That makes it especially good for younger children who are still learning how materials work.
This recipe uses common kitchen ingredients. The clay is not meant to be eaten, but it avoids many ingredients found in store-bought craft products. For families with allergies, it is easy to review each ingredient before mixing.
What you need to make all-natural clay at home
This is a soft, salt dough-style clay that air-dries over time. It is best for ornaments, sculptures, pretend play pieces, and simple decorations.
Ingredients
2 cups all-purpose flour (https://amzn.to/4xmIx7A)
1 cup fine salt (https://amzn.to/4iWO9BV)
3/4 cup warm water, plus a little more if needed
1 tablespoon vegetable oil or olive oil (https://amzn.to/4ioa30H) (https://amzn.to/4h1qnC8)
Optional natural color - Beet powder for pink (https://amzn.to/4ysX02C) - Turmeric for yellow (https://amzn.to/3VmMf3E) - Cocoa powder for brown (https://amzn.to/4cGgxUZ) - Spinach powder for green (https://amzn.to/4zXZ58q) - A few drops of plant-based food coloring (https://amzn.to/4gJwcFA)
Tools
Large mixing bowl
Measuring cups and spoons
Wooden spoon
Rolling pin or smooth bottle
Cookie cutters
Toothpicks, craft sticks, or child-safe sculpting tools
Parchment paper or a washable mat
Keep the recipe simple the first time. Plain clay is easier to mix, and children can paint it after it dries.
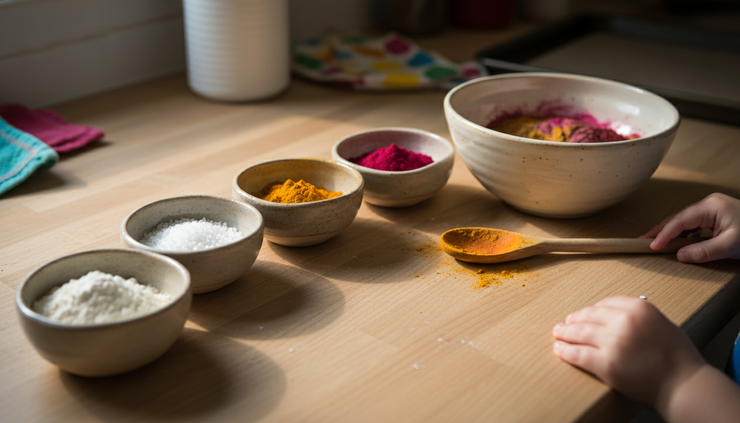
Step-by-step guide for making the clay
1. Mix the dry ingredients
Add the flour and salt to a large bowl. Stir well so the salt spreads evenly through the flour. This helps the clay feel smoother and dry more evenly.
2. Add color if you want tinted clay
If using powdered natural color, mix it into the dry ingredients before adding water. Start small. Natural colors can be strong, especially turmeric and cocoa.
For multiple colors, make a plain batch first, then divide it into smaller bowls. Add different colors to each portion.
3. Pour in the water slowly
Add the warm water a little at a time while stirring. The dough should start to clump together. If it looks dry and crumbly, add more water 1 teaspoon at a time.
4. Knead until smooth
Use clean hands to knead the clay for 3 to 5 minutes. It should feel soft but not sticky. If it sticks to fingers, sprinkle in a little flour. If it cracks badly, add a few drops of water and knead again.
5. Add oil for softness
Knead in the oil. This makes the clay smoother and easier for small hands to shape.
6. Let it rest
Cover the clay with a damp towel and let it sit for about 10 minutes. This short rest makes it easier to roll and cut.
7. Shape, dry, and decorate
Place finished pieces on parchment paper. Let them air-dry for 24 to 48 hours, turning them once if they are thick. Drying time depends on size and humidity.
For faster drying, an adult can place pieces on a baking sheet and dry them in a low oven, around 200°F, checking often. Thin pieces work best.
Easy techniques that work well for children
Children do not need advanced craft skills to enjoy homemade clay. Start with simple techniques that feel good in their hands.
Rolling
Roll clay into snakes, balls, beads, coils, and pretend noodles.
Pressing
Press leaves, buttons, shells, toy animal feet, or fork tines into the clay to make patterns.
Cutting
Use cookie cutters for stars, hearts, circles, animals, and letters.
Stacking
Build snowmen, towers, tiny cakes, or silly creatures from simple shapes.
Pinching
Make small bowls, nests, caves, and pinch pots by pressing a thumb into a ball of clay.
Let children test ideas freely. A lumpy turtle or crooked star is still a successful project if the child made choices and enjoyed the process.

Child-friendly craft ideas to try
Nature print ornaments
Flatten a piece of clay and press a leaf, fern, or flower into the surface. Lift it away to reveal the print. Use a straw to make a hole at the top before drying.
Pretend bakery set
Make mini cookies, cupcakes, donuts, and breads. Children can use bottle caps, spoons, and craft sticks to add details. Once dry, paint them for pretend play.
Story stones
Shape flat ovals and decorate each one with a simple picture, such as a sun, house, tree, cat, or moon. Use them later for storytelling games.
Name plaques
Roll out a rectangle or oval. Children can press letter stamps into the clay or shape letters from thin coils. This makes a sweet bedroom door sign or gift.
Tiny animal friends
Start with basic shapes. A ball becomes a head, a coil becomes a tail, and small dots become eyes. Keep pieces chunky so they hold together while drying.
Safety tips for calm and happy crafting
Homemade clay is safer when the setup is simple and supervised.
Wash hands before and after crafting.
Remind children that the clay is for making, not tasting.
Avoid tiny dried pieces for children under 3, since they can be a choking risk.
Check for wheat or ingredient allergies before using flour-based clay.
Keep natural color powders away from eyes and mouths.
Use washable mats, aprons, or old shirts to make cleanup easier.
Let adults handle oven drying, hot trays, and sharp tools.
If a child wants to use beads, buttons, or small decorations, match the materials to their age and supervision needs.

Keep the focus on exploration
The best clay sessions are not about perfect results. They are about discovery. Ask open questions like, “What happens if you press this shell into the clay?” or “How could we make that tower stand taller?”
Store unused clay in an airtight container or zip-top bag in the refrigerator for up to a few days. If it dries out, add a few drops of water and knead. If it smells off or changes texture, make a fresh batch.
With one bowl of homemade clay, children can build whole worlds. Set out simple tools, offer gentle guidance, and leave room for surprises. The real win is not the ornament, animal, or handprint at the end. It is the confidence children build while turning a soft lump of clay into something all their own.
Comments